


Photo by Glenn Carstens-Peters on Unsplash
File/Image upload using Multer, Formik, ExpressJs, ReactJs, and MongoDB


This article was written to help people like myself that have had a hard time finding resources about file uploads using the tools listed in the title —Let's get started 😊
I'm assuming you already know how to install react and set up a react app. For a refresher on how to do this, you can check out my article on building a search component.
We are going to start with building a form with formik on the frontend and then passing the values of the form to the Mongo Database using Multer and ExpressJS, then pulling those values from the database and displaying them on our app.
Frontend
In App.js, we install formik
yarn add formik
or
npm install formik
After installation, we import the formik hook to our App.js and set initial values for our form —this is the same as creating a state for our form values. Formik handles all that behind the scene for us.
We also add an onSubmit function that handles the values of our form when it is submitted— for now, we can just log them to the console.
import React from 'react';
import { useFormik } from 'formik';

const App = () => {
  const formik = useFormik({
    initialValues: {
      name: '',
      number: '',
      photo: '',
    },
    onSubmit: (values)=>{
      console.log(values);
    }
  });
  return (
    <form>
      <input/>
    </form>
  );
};

export default App;
Now, we create a form with name, number, and photo input fields, since we want to upload an image, the input type for photo is file.
  return (
  <form onSubmit={formik.handleSubmit} encType="multipart/form-data">
      <div>
        <label> Name</label>
        <input type='text' name='name' />
      </div>
      <div>
        <label> Number</label>
        <input type='tel' name='number' />
      </div>
      <div>
        <label> Upload File</label>
        <input type='file' name='photo' accept='image/*' />
      </div>

      <button type='submit'>Submit</button>
    </form>
  );
When we fill the form fields and submit our form, the console shows empty form entries. We need to add an onChange to communicate what we have entered to the formik initial values created and also set values for our inputs.
Formik already handles change for us so we can just go ahead and add it.
   <form onSubmit={formik.handleSubmit} encType="multipart/form-data">
      <div>
        <label> Name</label>
        <input
          type='text'
          name='name'
          onChange={formik.handleChange}
          value={formik.values.name}
        />
      </div>
      <div>
        <label> Number</label>
        <input
          type='tel'
          name='number'
          onChange={formik.handleChange}
          value={formik.values.number}
        />
      </div>
      <div>
        <label> Upload File</label>
        <input
          type='file'
          name='photo'
          accept='image/*'
          onChange={formik.handleChange}
        />
      </div>

      <button type='submit'>Submit</button>
    </form>
Now when we fill out our form, the console shows us entries for name and number but the photo field still shows up empty.
The value for the photo input hasn't been set like other input fields, and to do this we use the formik method setFieldValue which returns the value as a file instead of a string like the other input fields. setFieldValue accepts two variables, the fieldname we want which in this case is photo and the target event.
 <div>
        <label> Upload File</label>
        <input
          type='file'
          name='photo'
          accept='image/*'
          onChange={(e) =>
            formik.setFieldValue('photo', e.currentTarget.files[0])
          }
        />
      </div>
In our console.log we can see that the file uploaded is returned. Our frontend works, we can set up our backend and return later to link the frontend.
Backend
We create a folder on the root called Backend and run yarn init or npm init, then we install the following
yarn add express cors mongoose multer dotenv
We also install nodemon as a dev dependency, nodemon restarts the server automatically for us when we save.
yarn add nodemon -D
or
npm install nodemon --save-dev
In package.json we add a script to run nodemon using index.js as our entry point.
 "scripts": {
    "dev": "nodemon index.js"
  },
Now, we can start the server by running yarn run dev
We create a file called index.js and import express, multer, and cors —
cors allows the frontend to access URL that isn't in the same origin, you can read more about it here. Our database URL and PORT can be stored in a .env file which we would get to later. For now, we set our PORT to 3001
const express = require('express');
const cors = require('cors');
const multer = require('multer');
const app = express();


const PORT = 3001;
app.listen(PORT)
We create a folder called models and add a file called person.js. In person.js we import mongoose and create a schema for our database.
At this point, I'm assuming you already have an account with MongoDB, if not you can create one here. After account setup, we copy our database URL and connect it to our database.
const mongoose = require('mongoose');

mongoose
  .connect(
    'mongodb+srv://<username>:<password>@cluster0.49wjh.mongodb.net/<databaseName>?retryWrites=true&w=majority'
  )
  .then((result) => {
    console.log('connected to mongo database');
  })
  .catch((err) => {
    console.log('error connecting to database', err.message);
  });

  const personSchema = new mongoose.Schema({
      name: String,
      number: Number,
      photo: String
  })

  module.exports = mongoose.model('Person', personSchema)
In the database URL, fill in the part of the username, password, and databaseName. Also, it is safer to store database URLs in a .env file so that your database details are not made public.
So let's create a .env file on the root folder and add our database URL and PORT number.
MONGODB_URI = 'mongodb+srv://<username>:<password>@cluster0.49wjh.mongodb.net/uploadDB?retryWrites=true&w=majority'
PORT = 3001
Now we can edit our code
const url = process.env.MONGODB_URI
mongoose
  .connect(url)
and on index.js we import dotenv and edit our PORT like this
require('dotenv').config();

const PORT = process.env.PORT;
app.listen(PORT);
We import the model we created into our index.js and save our input to the server using the mongoose save method
require('dotenv').config();
const express = require('express');
const cors = require('cors');
const multer = require('multer');
const app = express();
const Person = require('./models/person');

app.use(express.json());
app.use(cors());
app.post('/api/persons', (req, res) => {
  const body = req.body;

  const person = new Person({
    name: body.name,
    number: body.number,
    photo: req.file,
  });
  person
    .save()
    .then((savedPerson) => {
      res.json(savedPerson);
    })
    .catch((err) => console.log(err.message));
});

const PORT = process.env.PORT;
app.listen(PORT);
When we save an input to the server, it doesn't get displayed because we haven't made a get request for our entries. We use the mongoose find method to do that.
app.get('/api/persons', (req, res) => {
  Person.find({})
    .then((persons) => {
      res.json(persons);
    })
    .catch((err) => console.log(err.message));
});
We go to http://localhost:3001/api/persons/ to see an array of all our entries, since we haven't saved any input, we'll see an empty array.
We can use Postman to test our post request or we can use VS code rest-client extension — here, we use VScode rest client.
After installing the extension, create a file called creat_request.rest then we add our inputs and post a request by clicking send request.
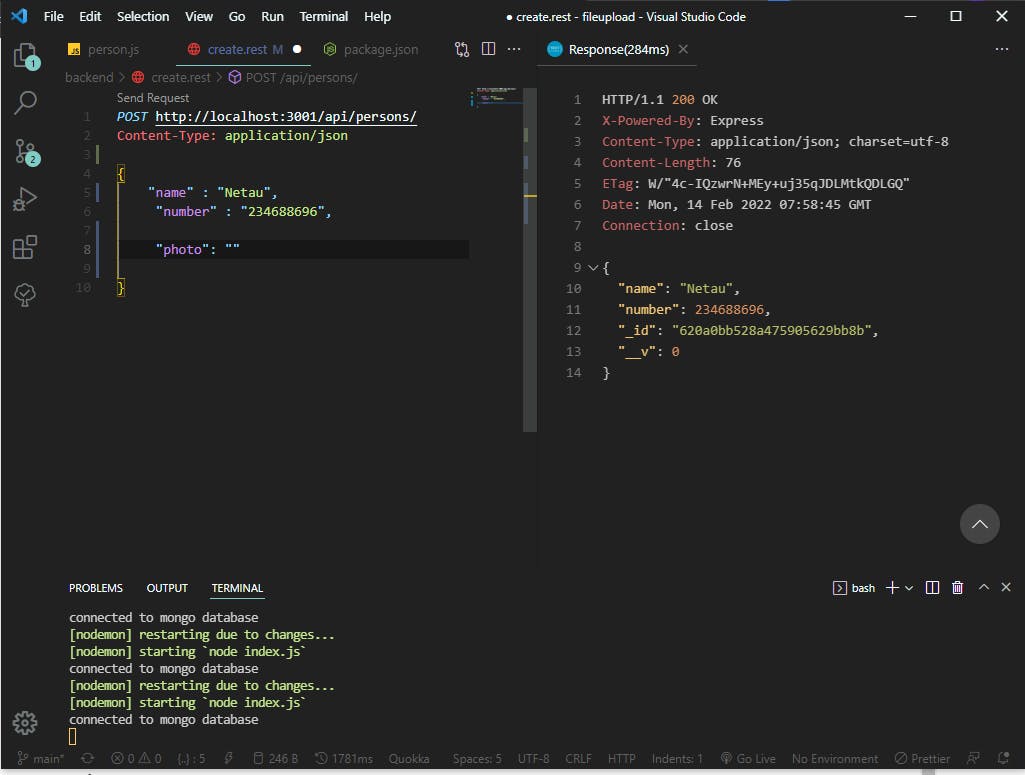 We can see that the request responds with a 200 OK code, meaning our request was successful. if we go back to
 http://localhost:3001/api/persons/ we'll see our entry displayed.
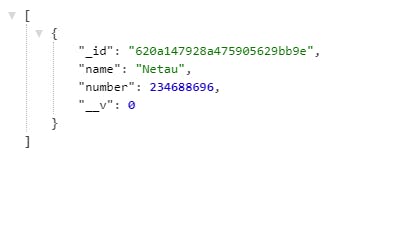
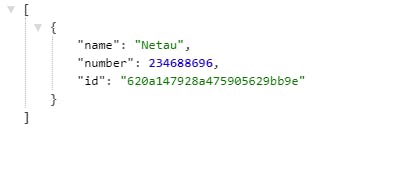
Mongoose gives our data a unique id and also another entry _v as we can see above, to remove the prefix from _id and delete '_v' from our display, add this code to our person.js file.
personSchema.set('toJSON', {
  transform: (document, returnedObj) => {
    returnedObj.id = returnedObj._id.toString();
    delete returnedObj._id;
    delete returnedObj.__v;
  },
});
Now we have this
We notice that only the name and number fields are being displayed. We'll use multer (express middleware) for the file upload and test it out using postman.
First, we create a folder called uploads, this would hold all uploaded images.
In index.js, the multer middleware is passed using app.use() to the specified path /uploads. You can read more on multer here
const path = require('path');

app.use('/uploads', express.static(path.join(__dirname, 'uploads')));

const storage = multer.diskStorage({
  destination: (req, file, cb) => {
    cb(null, './uploads');
  },
  filename: (req, file, cb) => {
    cb(
      null,
      new Date().toISOString().replace(/:/g, '-') + '-' + file.originalname
    );
  },
});
We also define the file type that can be passed
const filefilter = (req, file, cb) => {
  if (
    file.mimetype === 'image/png' ||
    file.mimetype === 'image/jpg' ||
    file.mimetype === 'image/jpeg'
  ) {
    cb(null, true);
  } else {
    cb(null, false);
  }
};

const upload = multer({ storage: storage, filefilter: filefilter });
Now, we edit our post request to include a single upload that would be saved to the uploads folder, and we pass in req.file.filename to photo, the rest are just the file paths for the photo
app.post('/api/persons', upload.single('photo'), (req, res) => {
  const body = req.body;

  const person = new Person({
    name: body.name,
    number: body.number,
    photo:
      req.protocol + '://' + req.get('host') + '/uploads/' + req.file.filename,
  });
  person
    .save()
    .then((savedPerson) => {
      res.json(savedPerson);
    })
    .catch((err) => console.log(err.message));
});
To test this on Postman we select form-data and change the value from text to file, then we upload an image. When we send the post request we get this
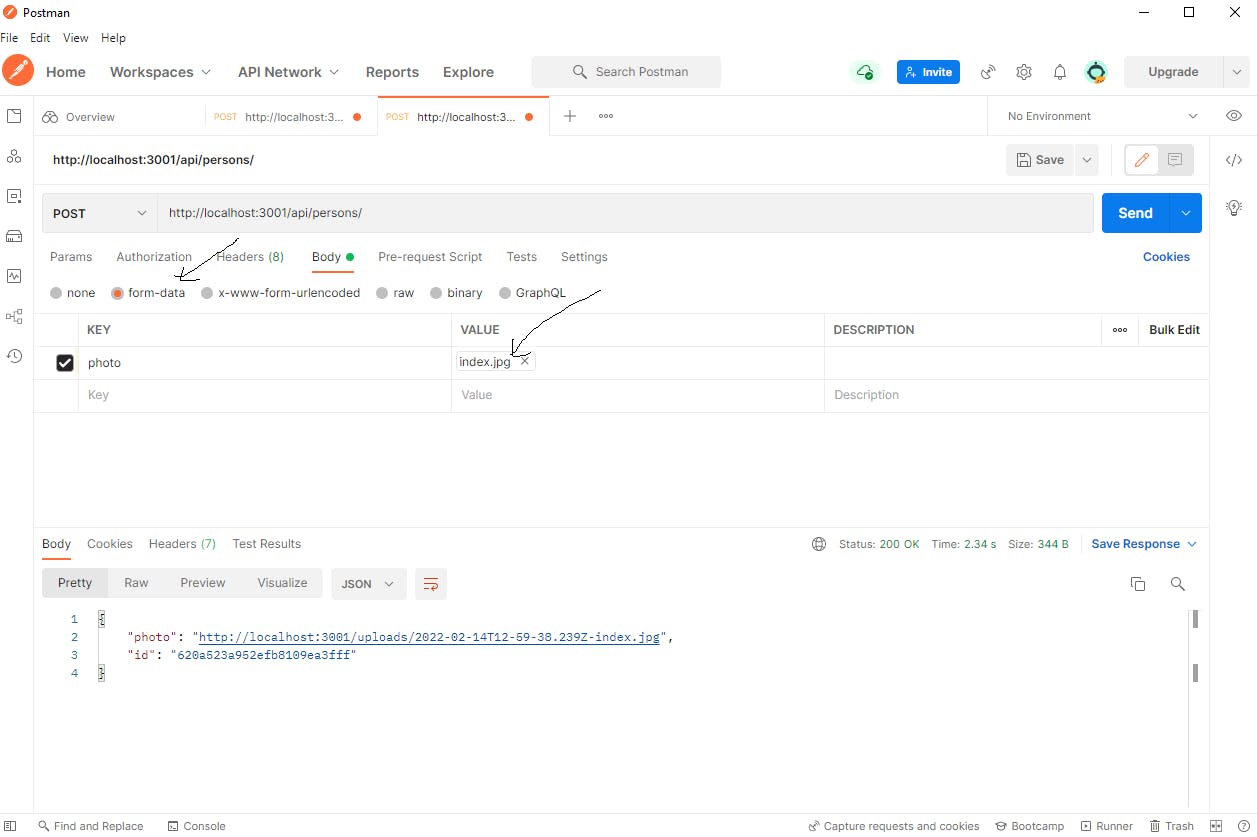
If we check the uploads folder we would see the image there, we can also see the image was successfully uploaded to the database when we check our Mongo account.
Linking Frontend to Backend
Now that our images can be uploaded on the backend, we return to the frontend to properly link it and also use axios to fetch and post data to our database.
We install axios and import it to app.js
yarn add axios
Earlier, we created the input form for our data but we didn't create a way of displaying the input entries. It would make our code cleaner to separate the form and display into different components but for now, let's write it this way.
We create a person state that would handle the data retrieved from the database, we also set the URL of our backend endpoint, then we use the axios.get method to retrieve all data from the database and update the persons state.
import React, { useState, useEffect } from 'react';
import axios from 'axios';

const [persons, setPersons] = useState([]);
const url = 'http://localhost:3001/api/persons/';

 useEffect(() => {
    axios.get(url).then((res) => {
      setPersons(res.data);
    });
  }, []);
We loop through our persons array and return the displayed content to our app.
 <div>
        {persons.map((person) => (
          <div key={person.id}>
            <img src='' alt='profile-pic' />
            <h4>Name:{person.name}</h4>
            <h4>Number:{person.number}</h4>
          </div>
        ))}
      </div>
Now we can see some of the data from the backend which we sent earlier via postman.
If we fill out a form and submit it, we see that our entry does not display on the app this is because we haven't updated our onSubmit function.
On submit, we use axios to make a post request to the URL we already defined, we also make use of FormData to construct our inputs properly to form fields that can easily be sent over to the backend.
   onSubmit: (values) => {
      console.log(values);

      const formData = new FormData();
      for (let value in values) {
        formData.append(value, values[value]);
      }
      axios.post(url, formData).then((res) => {
        setPersons(persons.concat(res.data));
      });
    },
We loop through our values and then append them to formData, this formData is then posted to the server using axios.post method.
Now our entries display on our app.
One more thing we do is to set the src for the image.
    {persons.map((person) => (
          <div key={person.id}>
            <img src={person.photo} alt='profile-pic' />
            <h4>Name:{person.name}</h4>
            <h4>Number:{person.number}</h4>
          </div>
        ))}
Note: for Multer to work the form tag must have an encType attribute set to multipart/form-data
Everything is set, our image successfully displays and is also uploaded to the database 😃
You can add some CSS to style your app up. I wouldn't be doing that right now 😆
I hope this article has been helpful — pardon all grammatical errors, and if there are better ways to achieve this, blow up the comment section I am ready to learn! 😃😊